Reading secrets from KeyVault in your Azure Cloud Service
 Azure Cloud Service was one of the earliest Platform as a Service offerings by Microsoft Azure. With Cloud Services you can run web applications or run background applications. Since it is a PaaS offering, you dot not need to worry about the issues that comes with IaaS, patching for example and they offer a lot of flexibility. They are not officially deprecated, though Microsoft is pushing for the use of other PaaS offerings. So, if you’re starting to build a new app today you probably don’t want to choose the Azure Cloud Service. You might however, still have a few running in production today. If you do so, then at lease make sure you are reading and using your application secrets in a secure way. This blog will help you do that as it will explain how to read secrets from Azure KeyVault from your Azure Cloud Service! In a previous post I explained how you can create the KeyVault I use in this post.
No Managed Service Identity
You would preferably use a Managed Service Identity to access Azure Key Vault and avoid keeping client Secret key in cloud service configuration. In absence of managed service identities for cloud services, you can use Certificate Credentials for application authentication to help establish application identity and get access to key vault for reading keys, secrets etc.
We first need to create a Service Principal in AD and an App registration. Using a certificate we assign to both this Service Principal and our Cloud Service, we can authenticate with KeyVault as if we are this Service Principal.
Azure DevOps
All of the next steps are part of my pipeline in Azure DevOps. Before we can create the SP we first need to make sure that the service connection we use in Azure DevOps has enough permissions to create a new SP in our Azure AD. Here’s how to do that. In Azure DevOps go to Project Settings, Service connections and find the service connection you will use and click ‘Manage Service principal’. This will open a tab to the App Registration in Azure AD. Go to Api Permissions and add ‘Application.ReadWrite.OwnedBy’ from the ‘Azure Active Directory Graph (1)’. In the end it should look like:

Create the Service Principal
I use the following commands to create the SP and App Registration in an Azure CLI task:
call az ad sp create-for-rbac --name $(azureAdApplicationName) --skip-assignment
call az ad app create --display-name $(azureAdApplicationName) --required-resource-accesses @$(System.DefaultWorkingDirectory)/drop/AppRegistrationKeyVaultPermissionManifest.json
Here are the contents of AppRegistrationKeyVaultPermissionManifest.json. We need to do this to be authorised to call the KeyVault API.
[
  {
    "resourceAppId": "cfa8b339-82a2-471a-a3c9-0fc0be7a4093",
    "resourceAccess": [
      {
        "id": "f53da476-18e3-4152-8e01-aec403e6edc0",
        "type": "Scope"
      }
    ]
  }
]
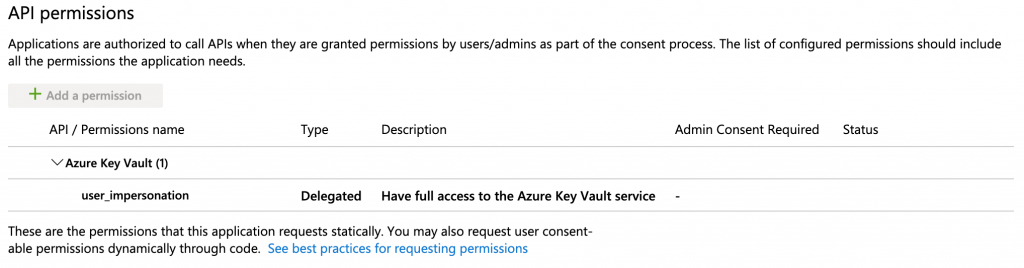
After you run this command your should find your new App registration in Azure AD. If you then go to it’s API Permissions you should something similar to this:
Next, we need the ObjectID and the AppId of the SP we just created. The ObjectID is used later on to give the appropriate Access Policies in KeyVault, the AppId is needed to upload the certificate to the SP in a later step. Unfortunately, not both are being returned from the create command above so we need to query AD to get them. The following script will do that and store the results in an Azure DevOps variable for later use.
$sp = Get-AzureRmADServicePrincipal -DisplayName $(azureAdApplicationName)
$objectId = $sp.Id
$objectId

$appId = $sp.ApplicationId
$appId

Write-Host "##vso[task.setvariable variable=AADAppId;]$appId"
Write-Host "##vso[task.setvariable variable=AADObjectId;]$objectId"
Certificate
Now it’s time to add the certificate to the SP. In this example I will use a Self-Signed certificate which I created using the following command:
$cert = New-SelfSignedCertificate -Subject "CN=<certificateName>" -CertStoreLocation "Cert:\CurrentUser\My" -KeyExportPolicy Exportable -KeySpec Signature
In order to export the generated certificate with a private key to a password protected PFX file, you will need its thumbprint. It can be copied from the results of New-SelfSignedCertificate command:
$CertPassword = ConvertTo-SecureString -String “YourPassword” -Force –AsPlainText

Export-PfxCertificate -Cert cert:\LocalMachine\My\2779C7928D055B21AAA0Cfe2F6BE1A5C2CA83B30 -FilePath C:\certificateName.pfx -Password $CertPassword
This pfx needs to be uploaded into Azure DevOps as a secure file. Navigate to Pipelines → Library → Secure files and upload the certificate.
Add the ‘Download secure file’-task to your pipeline and select your certificate. We now need to get a base64 string of the certificate since that’s the format in which we can give it to the SP. Here’s a script to do that. It will save the value in an Azure DevOps variable for later use:
$secName = “$(certificateName).pfx”
$tempDirectory = $env:AGENT_TEMPDIRECTORY

$pfxFilePath = Join-Path $tempDirectory $secName

$cert = New-Object System.Security.Cryptography.X509Certificates.X509Certificate2
$flag = [System.Security.Cryptography.X509Certificates.X509KeyStorageFlags]::Exportable

$cert.Import($pfxFilePath, "$(certificatePassword)", $flag)

$bin = $cert.RawData
$base64Value = [System.Convert]::ToBase64String($bin)

Write-Host "##vso[task.setvariable variable=certificateBase64Content;]$base64Value"
Now add another ‘Azure CLI’-task to the pipeline and let it execute the following command tho upload the certificate to the SP:
az ad app credential reset --id $(AADAppId) --cert "$(certificateBase64Content)"
In yet another ‘Azure CLI’-task we will execute the following commands to upload the certificate to your cloud service:
$secName = “$(certificateName).pfx”
$tempDirectory = $env:AGENT_TEMPDIRECTORY

$pfxFilePath = Join-Path $tempDirectory $secName

Add-AzureCertificate -ServiceName $cloudServiceName -CertToDeploy $pfxFilePath -Password "$(certificatePassword)"
Azure KeyVault Access Policies The last thing we need to do is give this Service Principal the appropriate access policy in our KeyVault. Just like with the App Service in the previous blog, I’ve just an ARM template to do that:
{
    "$schema": "https://schema.management.azure.com/schemas/2015-01-01/deploymentTemplate.json#",
    "contentVersion": "1.0.0.0",
    "parameters": {
        "keyVaultName": {
            "type": "string"
        },
        "objectId": {
            "type": "string"
        },
        "secretsPermissions": {
          "type": "array",
          "defaultValue": [
            "list"
          ],
          "metadata": {
            "description": "Specifies the permissions to secrets in the vault. Valid values are: all, get, list, set, delete, backup, restore, recover, and purge."
          }
        },
        "tenantId": {
            "type": "string"
        },
        "location": {
            "type": "string"
        }
    },
    "variables": {},
    "resources": [
        {
            "type": "Microsoft.KeyVault/vaults/accessPolicies",
            "name": "[concat(parameters('keyVaultName'), '/add')]",
            "apiVersion": "2018-02-14",
            "location": "[parameters('location')]",
            "properties": {
              "accessPolicies": [
                {
                  "tenantId": "[parameters('tenantId')]",
                  "objectId": "[parameters('objectId')]",
                  "permissions": {
                    "keys": [],
                    "secrets": "[parameters('secretsPermissions')]",
                    "certificates": []
                  }
                }
              ]
            }
          }
    ]
}
I use the ”-task to deploy the template. In the ‘Override template variables’ box I enter:
-keyVaultName $(keyVaultName) -objectId $(AADObjectId) -secretsPermissions [“list”,”get”] -tenantId $(tenantId) -location $(location)
Code
We obviously also need some code in our Cloud Service to read the certificate and use it the authenticate with KeyVault and get secrets. Here’s how to do that. Make sure you add the certificate to your workers ServiceDefinition or it will not be installed on the VM that runs your service.
public class WorkerRole : RoleEntryPoint
{
    private static readonly string _keyVaultName = "MyDemoKeyVault";
    private static string _clientId = "<Application (Client) Id of your Azure AD app>";
    private static string _certificateThumbprint = "<Thumbprint of your cert>";

    public override async Task RunAsync()
    {
        var keyVaultClient = GetKeyVaultClientWithCertificateAuthentication();

        var secretToRead = "secret";

        var secret = await keyVaultClient.GetSecretAsync($"https://{_keyVaultName}.vault.azure.net/secrets/{secretToRead}");
    }

    private static KeyVaultClient GetKeyVaultClientWithCertificateAuthentication()
    {
        var certificate = GetCertificate();
        var assertion = new ClientAssertionCertificate(_clientId, certificate);
        return new KeyVaultClient(new KeyVaultClient.AuthenticationCallback((a, r, s) => GetAccessToken(a, r, s, assertion)));
    }

    private static X509Certificate2 GetCertificate()
    {
        var certStore = new X509Store(StoreName.My, StoreLocation.CurrentUser);
        certStore.Open(OpenFlags.ReadOnly);
        var results = certStore.Certificates.Find(X509FindType.FindByThumbprint, _certificateThumbprint, false);
        return results[0];
    }

    private static async Task<string> GetAccessToken(string authority, string resource, string scope, ClientAssertionCertificate cert)
    {
        var authContext = new AuthenticationContext(authority, TokenCache.DefaultShared);
        var result = await authContext.AcquireTokenAsync(resource, cert);
        return result.AccessToken;
    }
}